Product Documentation
Relay: Authentication Types
When a message comes in we can check to ensure the message has the proper authentication associated with it and passes. If the message does not pass authentication a HTTP response code of 403 Forbidden will be returned to the system originating the webhook.
When leaving our system sending out to the destination endpoint URL you can assign custom authentication parameters to be attached to the request so the destination can properly authenticate the request. This can be helpful if you want to only write one authentication module for your system or if the originating system is using an authentication method that is too complex for the calling system to handle, for example an HMAC signature.
Supported Authentication Schemes
Listed below are the authentication schemes for both Inputs and Destinations. For the most part the schemes are the same except for the first option.
Inputs
- No Authentication
- Basic Authentication
- Token
- HMAC SHA1 Hash
- HMAC SHA256 Hash
Destinations
- Passthrough
- Basic Authentication
- Token
- HMAC SHA1 Hash
- HMAC SHA256 Hash
No Authentication
No authentication checks will be made when the request is coming in to the webhooks.io system.
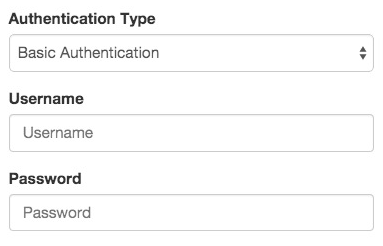
Basic Authentication
Inputs (incoming requests): Checks the request to ensure the proper credentials are supplied.
Destinations (outgoing requests): Adds the proper basic authentication header value to the outgoing message. If there was basic authentication on the incoming request that value will be overwritten with this new value.
Configuration
For both Inputs and Destinations you will simply select the Basic Authentication option under the Authentication Type select box. When doing this the dependent Username and Password fields will be displayed. Enter the corresponding values in those fields.
Token
Inputs (incoming requests): Checks the request to ensure the token variable exists and if so the value stored in the token variable is valid.
Destinations (outgoing requests): Adds the token variable and value in the proper location to the outgoing message.
Configuration
For both Inputs and Destinations you will select the Token under the Authentication Type select box. When doing this the dependent fields will be displayed.
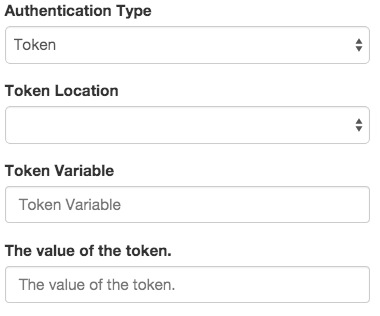
Token Location: If this is an incoming request this will be the to look for the token, for outgoing this is the location the token will be added to. Valid options include: Header, Form Field, Body, Query String.
Token Variable: The actual name of the variable of the token. If the token location is "Body" dot notation can be used to drill into JSON structures.
The value of the token: For incoming requests, this is the value that will be checked against, for outgoing this is the value that will be assigned to the token variable.
Retry Policies